Get started with Binder#
This page will help you get started building your own repositories and sharing them with Binder. For more information about the Binder Project in general, see About mybinder.org.
Another useful resource
![]()
The Turing Way also maintains a Zero-to-Binder tutorial in 3 common programming languages.
What is a Binder?#
A Binder (also called a Binder-ready repository) is a code repository that contains at least two things:
Code or content that you’d like people to run. This might be a Jupyter Notebook that explains an idea, or an R script that makes a visualization.
Configuration files for your environment. These files are used by Binder to build the environment needed to run your code. For a list of all configuration files available, see the Configuration files supported by repo2docker page.
Configuration files may be placed in the root of
your repository or in a binder/ folder in the repository’s root
(i.e. myproject/binder/).
A Binder repository can be built by a BinderHub, which will generate a link that you can share with others, allowing them to interact with the content in your repository.
What is mybinder.org?#
mybinder.org is an online service for building and sharing reproducible and interactive
computational environments from online repositories. Under the hood, it is a
federation of BinderHub deployments that are maintained by the
Binder community. It serves as both a public service and a demonstration
of the BinderHub technology, though it is by no means the only BinderHub
in existence. If you’re interested in deploying your own BinderHub for your
own uses, please see the BinderHub documentation
and don’t hesitate to reach out to the Binder community.
For more about the Binder Project
For more information about using mybinder.org as well as the team behind it,
check out about.
What is the Binder community?#
A collection of people that aim to make it easy to turn computational material (e.g. Jupyter notebooks, R scripts, and environment files) into computational environments (a Docker image) and serve this environment through the cloud. The underlying technology that manages this process is called BinderHub.
For more information, check out :ref:about.
What is BinderHub?#
BinderHub is the server technology that turns computational material into interactive computational environments in the cloud. It utilizes Kubernetes and JupyterHub in order to simplify the deployment process and make it easy to scale.
How can I prepare a repository for Binder?#
To prepare your repository for use with the BinderHub at mybinder.org, you should ensure that the following conditions are met:
The repository is in a public location online (e.g., on GitHub or BitBucket)
The repository does not require any personal or sensitive information (such as passwords)
The repository has configuration files that specify its environment (see below for an example)
The repository contains content designed for people to read.
Tip
For a list of sample repositories for use with Binder, see the Sample Binder Repositories page.
How can I customize my Binder environment?#
There are many ways to customize the Binder environment. For example, you can use many open source languages, configure the user interface, and more!
For more information, check out the How-to guides or the sample repository examples.
A Binder example#
For example, let’s take a look at a simple repository that requires a few packages in order to run.
Explore the repository contents#
If we inspect the contents of this repository, we see the following files:
./
├── environment.yml
├── index.ipynb
└── README.md
In this case, we have two important files:
A content file:
index.ipynbis a short Jupyter Notebook that generates a plot.An environment configuration file:
environment.ymlis a standard file that specifies a conda environment.
Important
You may notice that environment.yml is not Binder-specific. This is
intentional! Binder tries to use environment configuration files that are
already standards in the data science community. For a list of all
configuration files available, see the Configuration files supported by repo2docker page.
Get your own copy of this repository#
You can find a repository with these files at the following link:
To watch Binder in action, first fork this repository. This will
give you your own copy of the conda repository.
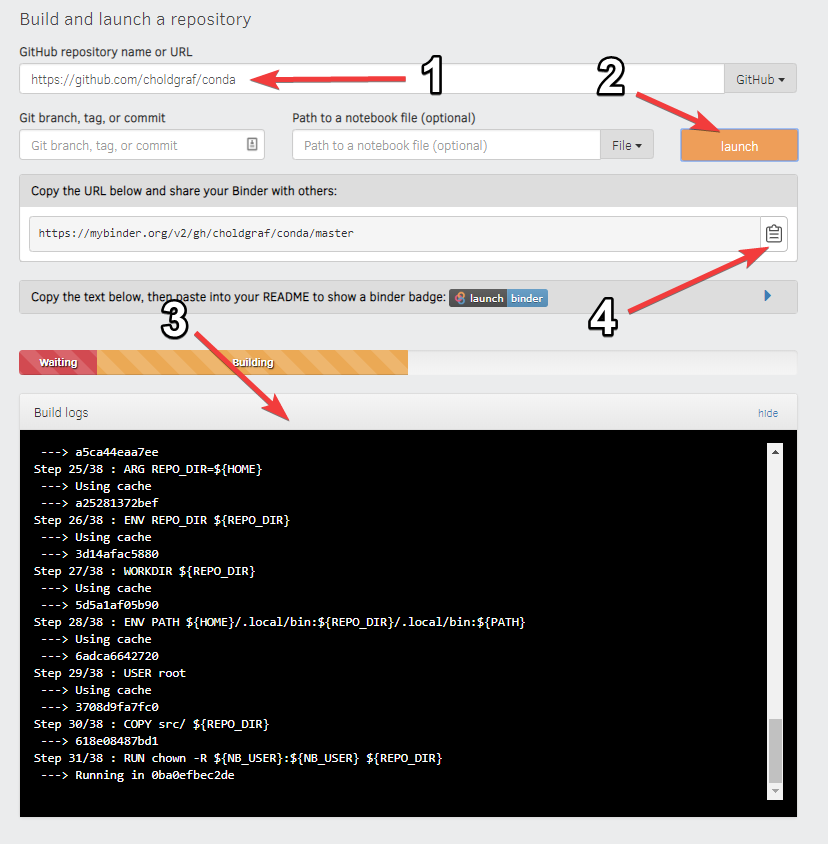
Build your repository#
Next, let’s build your Binder repository. Head to https://mybinder.org. You’ll see a form that asks you to specify a repository for mybinder.org to build. In the first field, paste the URL of your forked repository. It’ll look something like this:
https://github.com/<your-username>/conda
Finally, click the launch button. This will ask mybinder.org to build the environment needed to run the repository. You can click on the “Build logs” button to see the logs generated by the build process.
While your Binder repository is building, note the URL that points to your unique Binder. You can share this URL with a friend, allowing them to access an interactive version of your repository.
See below for a quick layout of the BinderHub user interface.
If your Binder repository has already been built once, then subsequent clicks on the Binder link will not re-trigger the build process. However, if you push any changes to the repository, then it will be re-built the next time somebody clicks a link.
If your environment files and content files are not housed in the same branch of the same repository, see the Use different repositories for content and environment page for how to generate a URL.
Now that you’re acquainted with Binder, see the Common use-cases page for more information about what you can do with it.